Subject | Science · Engineering Design |
Week Theme | We Are Problem-Solvers |
Lesson | Week 2 · Science · Lesson 2 |
Time | 53–55 minutes |
Grade Level | 2nd Grade (adaptable for Grades 1–4) |
Materials | Cardboard pieces (pre-cut helpful; include toilet paper & paper towel tubes) · Teddy bears (1 per group; must sit independently) · Tape · Brads · White glue · Extra-strong glue dots (optional) · Scissors · Canary cutters (1 per group) · Protective gloves · Testing results from Lesson 1 · Blank paper for design sketches · Cardboard Connections Chart (display for reference) |
Students will apply their knowledge of strength and material properties to design and build a cardboard chair that can support the weight of a teddy bear. Students will plan before building, test their designs, identify failure points, and make at least one improvement.
Students have learned that shape affects strength. Now they use that to solve a problem: build a cardboard chair that holds a teddy bear. There is no one correct design. Students plan, decide, test, fail, and improve.
The lesson introduces the engineering habit of planning before you build. Groups that start taping without a plan will run into failures, and that is useful. The debrief gives time to talk about what it felt like when something didn’t work and what it meant to try again.
The teddy bear has weight, sits in a familiar way, and is a neutral test subject. When a chair collapses under it, students laugh, so failing feels safe.
How can young inventors solve real problems for the people we care about?
Students design, test, and improve a cardboard chair, solving a problem the way inventors do: by trying again.
Gather and sort cardboard: flat sheets, rolls (toilet paper and paper towel tubes), corrugated pieces, thin card stock, and thicker cardboard.
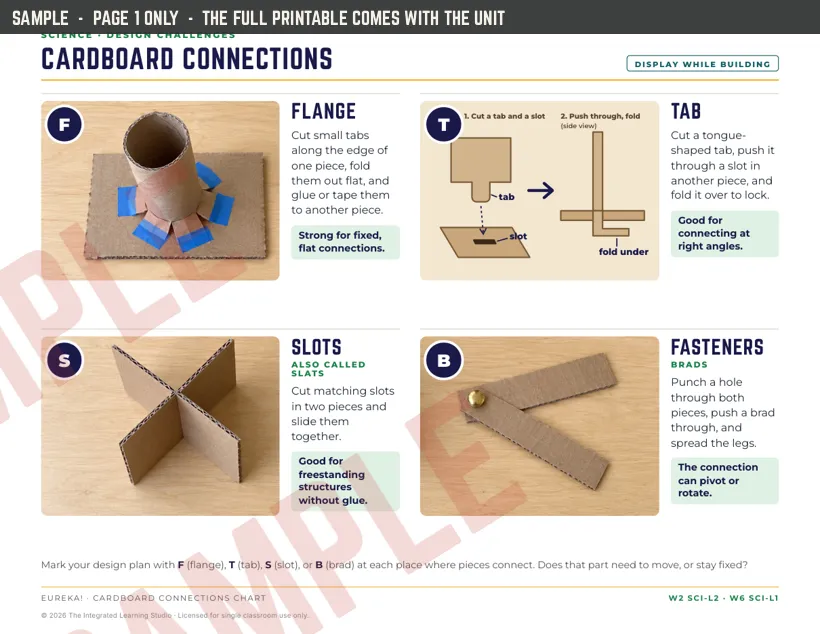
Display the Cardboard Connections Chart. It shows four ways to join cardboard: flanges, tabs, slots, and brads.
Post the testing results from Lesson 1 so students can check which shapes were strongest and which materials held the most weight.
Have canary cutters and protective gloves ready for the safety demo in step 1.
1Mini Lesson: The Challenge & Planning~13–15 minutes
Introduce the challenge.
Engineers, here is your challenge: can you design and build a chair from cardboard that holds a teddy bear? The chair must hold the bear for at least ten seconds without collapsing.
Introduce the planning requirement.
Before you touch any cardboard, you’re going to plan. Real engineers think first. On blank paper, sketch your design. Label the legs, the seat, and the back. Think about our last science lesson: which shapes are strongest? How will you make your chair strong enough?
Give groups 5 minutes to sketch and discuss before building. Circulate and ask:
- “Where will the weight of the bear be concentrated?”
- “How will you connect your pieces?”
- “What did your testing tell you about which shapes work best?”
Before groups build, introduce the canary cutters and protective gloves and demonstrate safe cutting (3–5 minutes).
We follow these tool rules so everyone stays safe, and that is the same reason our classroom has rules.
2Build & Test~30 minutes
Students build their chairs from their sketches.
Encourage testing early and often. Students can set the bear on a half-built chair to check stability.
When a chair collapses, treat it as data:
Where did it fail? Was it the legs? The seat? The joints? That information is exactly what you need. Engineers call this a failure point. Now you know what to fix. Can you redesign that part?
Require at least one improvement. Students sketch and note it in their notebook or on their sketch paper: what failed, what they changed, and what happened.
💡 Teacher Note: Groups who finish early can try to hold more weight than the bear or make the chair look more like a real chair. Groups who struggle can start with four stable legs before adding a seat.
3Gallery Walk & Debrief~10 minutes
If time allows, do a short gallery walk: chairs stay on tables and groups rotate to look at other designs. Then gather together.
What did you notice? What designs worked? What was the most creative solution you saw? Now, who will tell us about a moment when something failed and what you did about it?
Take 3–4 shares, focusing on failure and redesign. Close with the connection to perseverance.
Every engineer in this room tried something, had it not work, and tried again. That’s what problem-solvers do. It’s the same trait we’ve been reading about in Bink & Gollie and studying in our inventors. You didn’t just build a chair today. You showed perseverance.
In Week 3, Science Lesson 1, students test which materials absorb water and which are waterproof, then use what they find in a new design challenge.
Subject | Connection |
Reading | Like characters in the problem/solution stories students read, engineers face a challenge, try a solution, and sometimes try again. |
Writing | Some students may add today’s build to their brainstorm list as a personal narrative about perseverance. |
Social Studies | Point out in the Social Studies lesson that Garrett Morgan also tested, found problems, and redesigned his traffic signal. |
- NGSS · K-2-ETS1-2 — Develop a simple sketch, drawing, or physical model to illustrate how the shape of an object helps it function as needed to solve a given problem.Lesson connection: Groups sketch and label a chair design, choosing strong shapes for the legs, seat, and back before building.
- NGSS · K-2-ETS1-3 — Analyze data from tests of two objects designed to solve the same problem to compare the strengths and weaknesses of how each performs.Lesson connection: Groups test their chairs, find failure points, and compare designs during the gallery walk.
- NGSS · 2-PS1-2 — Analyze data obtained from testing different materials to determine which materials have the properties that are best suited for an intended purpose.Lesson connection: Students use their strength test results to choose materials and shapes for their chairs.
- C3 Framework · D2.Civ.12.K–2 — Identify and explain how rules function in public (classroom and school) settings.Lesson connection: During the safety demo, students learn that tool rules keep everyone safe, the same reason the classroom has rules.
© 2026 The Integrated Learning Studio · Licensed for single classroom use only.